Voice Chat
In order to use The Asian Place
Voice Chat service you will need to obtain a minimum of the following:
Download The Asian Place voice client programme and follow the installation steps, it should take you less than a minute to install. Just keep pressing "Next".
Furthermore you must meet the following points listed below and must be a registered user on our
Forums to be entitled to use our VOIP service fully. We wont accept those who just register to the forums for the sake of using our VOIP service.
- You must be a valid registered user on our forums,
- You must have over 100 posts to use our VOIP service, and have no SPAM!
- You must have no warning blocks filled in,
- You Must use your Own Forum Username when you log onto our VOIP client, otherwise you risk being kicked and possibly banned which is irreversible,
Finally once you have met all the requirements above, and have installed the
VOIP Client. you must
first request for permission
within this section of the forum, asking any server admin currently present to grant you rights to register with the server. Server admins are predominantly the forum moderators of The Asian Place. You must be present within the VOIP client "Lounge" whilst you post a request on the forums. The server admin will then verify your username before allowing you to register. Once your registration rights have been granted, the server admin will guide you through the stages of registering you with the server.
We also encourage you to read the following guide, step by step detailed below. This will give you a better understanding and make your user experience on our VOIP service user friendly.
Installation Step by Step User Guide
Step 1:
 Step 2:
- Right Click inside the white area and select "Add Server" as shown by the image below
 Step 3:
- Name the server "The Asian Place" as shown below:
 Step 4:
- After you have named the server, put in the Server IP address on the right hand side: 208.98.1.187:8796 as demonstrated in the image below followed by your forum username, also make sure the "Anonymous" box is ticked.:
 Step 5:
- Once you have done the above steps correctly, you will enter the VOIP room and you will remain in the Lobby as unregistered (U). Remember what was said on top of this page, before you join the VOIP room please make sure you have posted your request for registration In this section so a Server Administrator can give you registration and voice rights.
 Step 6:
- Once you have been given Registration rights, click on "Self" from the menu bar and then click on "Register with Server" be sure to use your forum username and a password of your choice.
 Step 7:
- Use your forum username and a password of your choice. Remember your username and password as you will need it everytime you log onto the VOIP client. Note registration will not be given out twice.
 Step 8:
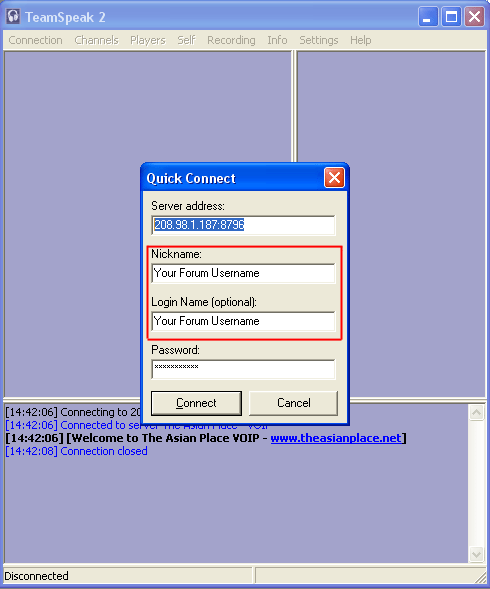
- Now once you have registered close everything and restart the VOIP client, Click on Connection > Quick Connect > then put in the Server IP address which is 208.98.1.187:8796 followed by your username and password that you had registered with:
 Step 9:
- Make sure your Nickname and Login Name are the same, otherwise you will not be able to connect:
 Step 10:
- Finally if you have done everything correctly you should be able to connect fine, and you will see you have the sign (R) besides your name:
 Step 11:
- You can also minimise the VOIP client, it will minimise into your icon tray bar near the clock, you can always double click and bring it up. Its the purple icon indicated with a redbox displayed around it.
 Tip:
Tip:
The next time you want to start up the VOIP client all you need to do is open it, and Select Connections > Quick Connect > Connect. It will already have the server IP address and your username in place. But you will need to enter your registration password each time you login. This is way you will save much time! Refer back to step 9.
If you are experiencing any difficulties then please email:
support[at]theasianplace[dot]net
The Asian Place Team


